
History
Vacuum splint technology began development in Europe during the 1970’s and crude devices arrived in the U.S. during the mid-1980s. EPCSAR began using vacuum splints in 1991 to facilitate difficult patient evacuations. In 2014, El Paso County fire departments and ambulances began adopting the technology. As you can see, EPCSAR was an early user of vacuum splints and has extensive experience in their use. EPCSAR currently employs the 6’ Vacuum Spine Board (VSB) from Med Tech Sweden.
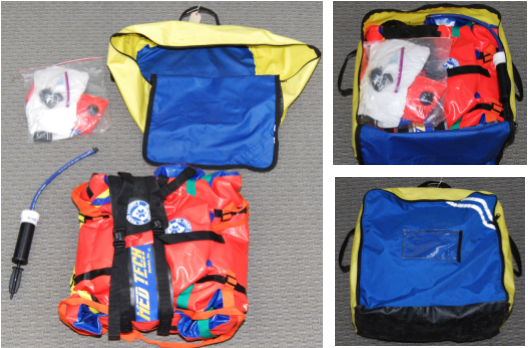
Vacuum Splint Body (VSB)
The 6’ VSB is a multi-chamber full-body splint that will accommodate most patients. Recommended maximum weight load for the 6’ VSB is 330 lbs. (150 kg). It is X-ray translucent, allowing a patient to be X-rayed without removal from the VSB. The VSB includes a Pelvic Strap System that can provide additional stabilization to the patient with a suspected open-book pelvic fracture. The VSB should be considered a medical device as well as an extrication tool.
Additional benefits and features of the VSB include:
- Reduces pain, bleeding, and further injury.
- Provides spinal motion restriction (SMR) with fewer complications associated with rigid backboards.
- Supports and restricts motion of injured extremities and pelvis.
- Conforms to the patient’s position of comfort.
- Provides thermal protection for the hypothermic patient.
- Compatible with the Wiggy’s sleeping bag, litter, and SKED.
- Cushions the patient in the litter or SKED, which helps on long evacuations.
- Reasonable weight and size for use in the austere environment.
- A flat VSB with the air evacuated can be used as a backboard for sliding under a patient that may be in a tight or confined space.
The VSB is essentially an airtight beanbag that is soft and flexible when air is in the VSB but becomes stiff and supportive when air is evacuated from the VSB. The patient is placed on the VSB using one of several techniques. The VSB is then secured and shaped around the patient. And finally, the air is evacuated out of the VSB using a hand pump. The device becomes firm and supports the patient. The patient and the VSB can then be placed in a sleeping bag, litter, and/or SKED for transport.
Indications and Contraindications
Consider using the VSB for the following:
- Any orthopedic injury, especially to the spine, ribs, lower extremity, pelvis, and skull.
- Head trauma or TBI.
- Internal injury from blunt force or penetrating trauma.
- Any patient who is experiencing significant pain.
- The patient who is hypothermic or is at risk of hypothermia.
- Long distance or long duration evacuations.
- Under patient cushioning especially in the SKED
There are no hard contraindications for using the VSB. However, consider the following:
- We do not use the stand-alone C Collar with the VSB. The VSB is used in place of the standard C Collar by tightly molding the VSB around the head and neck. This allows for more patient comfort, better immobilization, and better airway access.
- The VSB is not well suited for using a helmet on a patient with a neck injury. The helmet width tends to make it difficult to wrap the VSP tight around the head and especially the neck of the patient. If rockfall is a significant concern then a helmet (or some type of head protection) should be used and the VSB wrapped as tight as possible around the neck area.
- The vacuum splint causes thermal retention and could exacerbate the hyperthermic patient’s condition. The splint shell can also become excessively hot under direct sun. For these reasons, ensure that you place a sheet between the patient and the VSB and do not lay the VSB in the hot sun prior to use (place in shade or put patient side toward the ground until ready to use). Use caution when using with the hyperthermic patient. The lead medical on scene will assess this situation.
- The pelvic strap system can assist with open-book pelvic fractures but could cause problems with different types of pelvic or hip fractures. The lead medical on scene will assess this situation.
All other restraint straps could cause problems with specific injuries. The lead medical on-scene must assess and direct the patient packaging.
How to use the VSB
Package the patient into the VSB systematically and with attention to detail. Rushing this process will cause problems and can negatively impact patient outcome.
- Evaluate the patient. Determine if the vacuum splint is suitable for the patient and the situation. Make a plan.
- Remove wet clothing from the patient. A dry sheet can be wrapped around the patient to provide comfort.
- Remove objects from the patient’s remaining clothing or that are attached to the patient. These can cause pressure sores and can puncture the splint.
- Prepare the splint by unbuckling the restraint straps and moving them into accessible positions. Remove the valve cap and tighten the valve (clockwise). The valve should always be screwed tight (clockwise) during use.
- Apply the splint to the patient. The splint can be laid out and the patient moved to the splint, or the splint can be worked under the patient if necessary, even if the patient is in a sitting position. Ensure you evacuate the air, creating a backboard, which allows you to slide the VSB under the patient If in a tight space. Once under the patient you allow air back in to mold around the patient and then evacuate the air again.
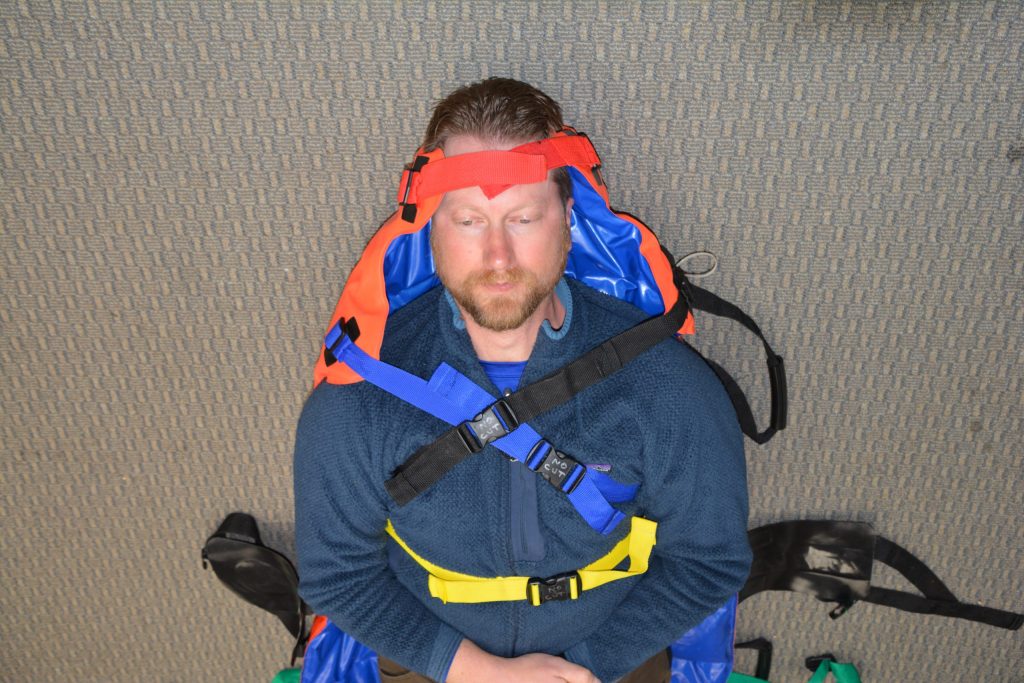
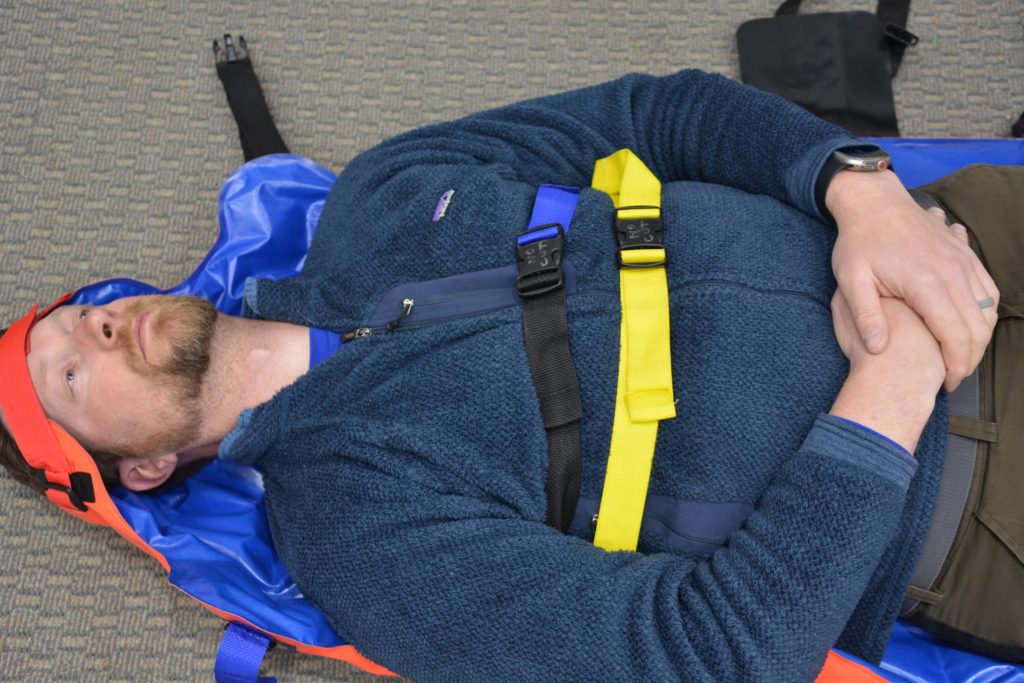
- Adjust the patient position in the splint. In general, the patient should be centered laterally in the splint and positioned vertically so that the red head strap meets the patient at the forehead. This is the optimal position, but patient condition may require something different, such as a left lateral recumbent position.

- Position and secure the Pelvic band. Detach the black pelvic bands from the splint. Position them over the pelvic area. Determine which numbered cleats match the position and reattach to the splint. Rescuers on each side of the splint can perform this quickly by communicating which cleat numbers to use. Buckle the straps over the patient and secure.
Pelvic straps cautions:

- The pelvic straps can be used as a pelvic binder when needed. In this case, they should be secured tightly over the greater trochanters to be effective.
- The pelvic straps may not be used over certain types of pelvic or hip injuries. The lead medical on scene must make this decision. If in doubt secure them loosely.
- The pelvic straps should never be secured tightly over the abdomen.
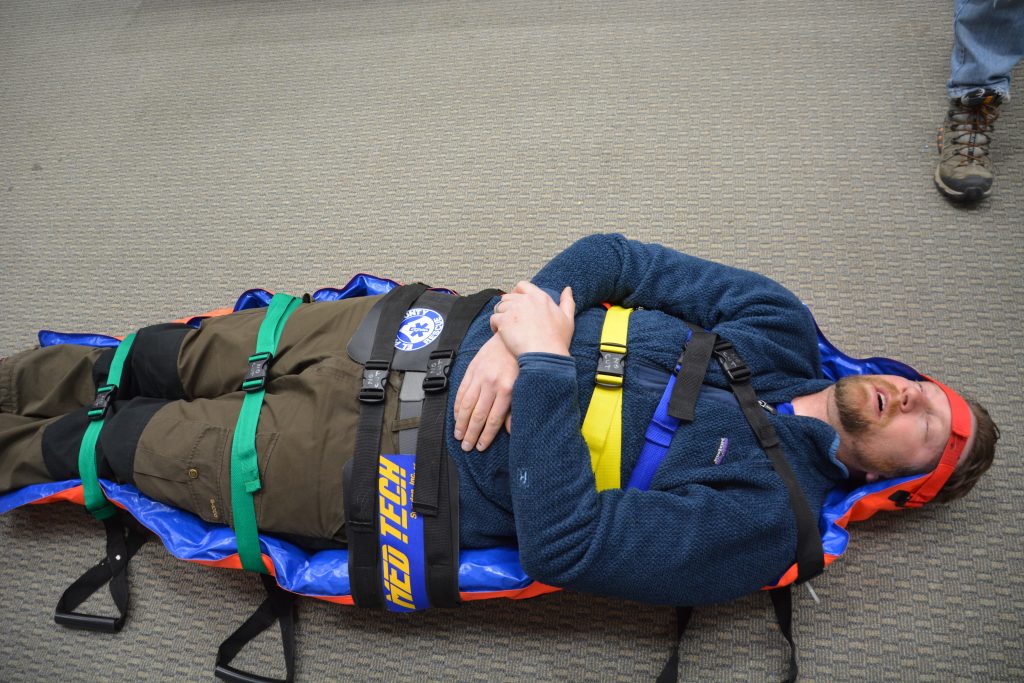
- Secure the patient using the restraint straps. Match the left and right straps by color. Form an X with the chest straps by going over the shoulders and under the arms. Ensure that the X does not ride high on the patient’s chest placing it close to the neck. The best position for the X is over the Xiphoid process/base of the sternum. Position the lower chest strap under the arms. Pull straps firm but not excessively tight. Some straps may be left loose or disconnected if the patient’s condition requires it. When tightening the straps do not jerk the straps. Instead, pull the strap towards the buckle and then gently pull the end of the strap to tighten. See the pictures. Note colors may differ.


- Attach the pump to the nozzle. Twist the nozzle attachment slightly clockwise when attaching and detaching the nozzle. This will help maintain the air seal.
- Using multiple rescuers on both sides of the patient, shape the splint around the patient in whatever position is best for the patient. Use the splint to support the patient’s bent knees unless contraindicated. Make the splint adapt to the patient, not the other way around. Use one person at the head of the patient to mold the VSB around the head and neck of the patient. As you mold the VSB around the head and neck ensure that the sharp edges of the VSB are not in contact with the skin, especially the ears and under the ears, as this can cause pain.
- Vacuum the air from the splint. The hand pump requires 60-70 strokes to fully deflate the splint. Over-deflating the splint will not cause damage. While pumping, continue to shape the splint around the patient and eliminate slack in the restraint straps that may develop.
- Replace the valve cap to protect the valve. Dust and liquids must be kept out of the valve.
- As with all patient splinting, reassess after the splint is applied. Verify circulation, motor, and sensation in extremities. Verify the patient is as comfortable as possible and that there are no pressure points. Verify the splint remains rigid. Resolve any issues before continuing.
- When appropriate for patient care, move the patient and splint into a Wiggy’s sleeping bag. Note the order of application: patient -> splint -> sleeping bag -> litter/SKED.
- Move the patient to the litter/SKED using the splint or sleeping bag carrying straps. Secure the litter or SKED as usual and transport the patient. Keep the pump and accessory kit with the patient during transport in case they are needed.
Cautions and Risks
NEVER use the splint by itself for any type of belayed transport (vertical, scree, helicopter hoist, etc.) The splint can be used by itself to carry a patient for a short distance on easy terrain.
Risks of using the vacuum splint include:
- Loss of splint integrity caused by air infiltration. This can result in delays, increased pain, bleeding, and additional tissue damage. Infiltration can be caused by:
- Puncture from boots, crampons, rocks, sticks, thorns, etc. It may be possible to temporarily fix a leak in the field with duct tape.
- Valve failure, usually from dirt or water getting into the valve. It may be possible to blow out the valve. There is a spare valve in the accessory kit.
- Patient pressure sores. Follow best practices to minimize this possibility. Reposition the patient within the splint if necessary.
- Occlusion of blood flow. If caused by the splint, this would likely be from a pressure point. Follow best practices to minimize this possibility and reposition the patient within the splint.
- Overheating the hyperthermic patient. Consider not using the splint for a hyperthermic patient unless necessary.
- Burns. The splint shell can become hot enough to cause skin burns when left under direct sunlight even for a short period of time. Keep the splint in shade or covered until ready to use.
- Sled affect. On uneven snow or ice the splint can easily slide and run away with a patient. When operating on snow or ice prepare the splint and sleeping bag in a belayed litter first, and then move the patient into the belayed unit. If this is not possible, belay the splint directly using the carrying straps. The straps are not rated specifically for belay so multiple straps should be engaged. Make the belay static so the splint cannot move against the anchor. Ice axes slipped through multiple straps can be an option.
- Avoid allowing snow inside the splint with the patient. The snow will melt and wet the patient.
Cervical Collars
The stand-alone C Collar is used to maintain C spine when moving the patient from a confined area such as a vehicle or rock area to the VSB. Once the patient is placed on the VSB the stand-alone C Collar is removed—while manually maintaining spinal immobilization. The VSB is then molded around the head and neck of the patient.
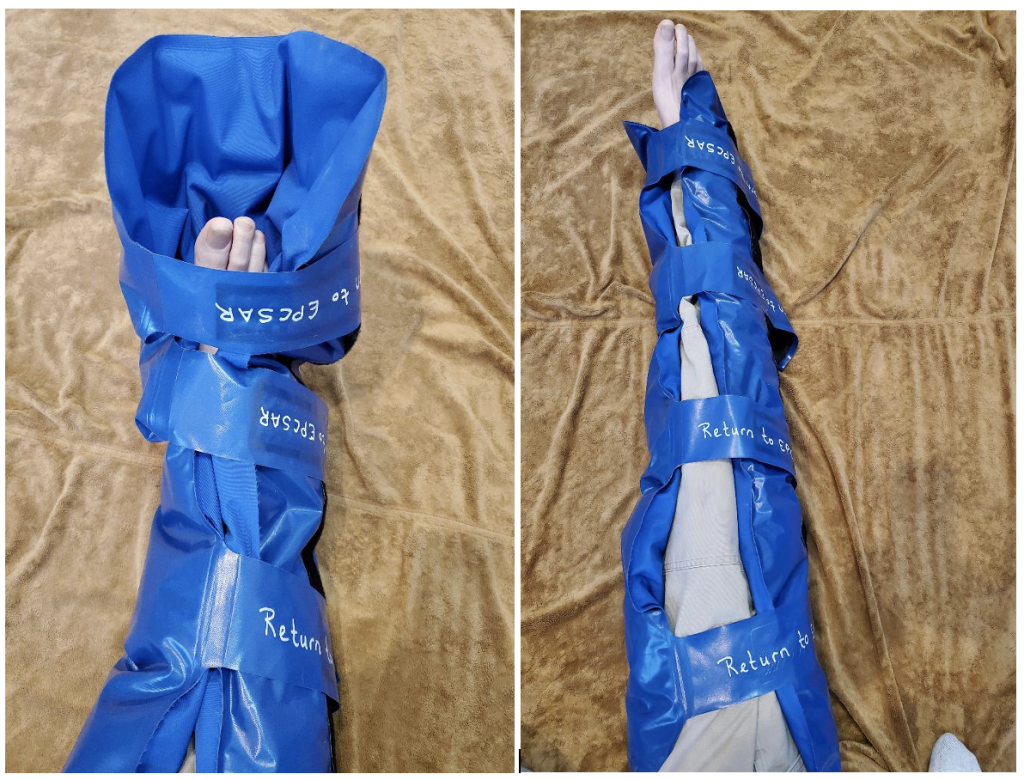
Vacuum Splint Leg (VSL)
The VSL is a multi-chamber leg splint that will accommodate most patients with either a leg, knee, ankle, or foot injury.
How to use the VSL
Unless circumstances dictate otherwise, splint the injured leg, ankle, foot, etc. with the SAMS splint first. Then place the leg into the VSL.
Package the patient’s leg into the VSL systematically and with attention to detail. Rushing this process will cause problems and can negatively impact patient outcome.
The VSL is placed under the injured portion of the leg ensuring that it is well above and below the injury. For any foot or ankle injury, it is critical that the VSL extend at least 2 inches above the toes before the air is evacuated. The straps or tape are then used to secure the splint to the patient. The air is evacuated ensuring that a slight bend in the knee is created as the air is evacuated.
Storage
Integrity of the VSB is essential to patient care and may affect patient outcome. For this reason, treat the VSB with care.
To stow the VSB in the carrying case:
- Verify the VSB, pump, and accessories are clean and decontaminated.
- Buckle all straps except the pelvic band. This makes the VSB easier to transport and deploy.
- Allow air to easily escape the splint when it is being folded up by opening the valve counterclockwise a few turns but not enough so that there is a risk of the valve falling off.
- Place the middle third of the VSB into the case; then fold the outside thirds on top.
- Clip and tighten the pelvic band around the entire VSB to hold it together.
- Retighten the valve making it ready to deploy.
- Inventory the accessory kit and place into the case. An inventory list is included in the kit.
- Place the hand pump into the case.
Cleaning Guidelines
It is very important that you close the valve before cleaning the VSB to prevent liquids from entering the VSB.
Scrub and rinse off bodily fluids with cold water before it has dried up, then clean the VSB as described below.
The VSB can be cleaned with normal soaps or detergents and hot water. Apply disinfectant as required. You may use a brush or cloth to remove stains and material, and you may use a hose to apply pressure, but never use a pressure washer. Finally, hang the splint up to dry.
The splint can be cleaned in a standard washing machine and dryer at 160 °F and using normal detergents, but remember to close the valve, and always wash it on a cold cycle if blood or other bodily fluids are found on the splint.
All Med Tech Sweden Vacuum Spine Boards are made with special heavy-duty double-coated Polyurethane, a material that is very durable. The product can be cleaned with stronger chemicals, such as paint thinner, when heavy stains occur. Chlorinated chemicals do not damage the product but may cause the colors to fade.
All straps and handles can be easily removed for cleaning or replacement, and can be washed using the same guidelines as the vacuum mattress. The valve can also be removed for cleaning separately using water. Be sure to replace it.
Disinfect areas of contamination (blood, mucus, or vomit) directly by wiping with liberal amounts of CaviCide or with the standard 1:10 household bleach solution (5.25%–6.15% sodium hypochlorite). Surfaces should be wetted for at least 5 minutes. Large areas or large amounts of contaminate can be hosed down first.
Disinfect straps by removing them and soaking them for several minutes in CaviCide or the standard 1:10 bleach solution. If contamination of the straps is too great and decontamination cannot be certain, then replace the straps.
Additional notes:
- If you are not trained or experienced in decontamination, seek help.
- You must wear PPE during the decontamination process, including gloves and eye protection.
- Thoroughly rinse with fresh water any surface decontaminated with bleach.
- Use caution if using a brush during decontamination. A brush can cause spray.
- Bleach solution must be fresh. The effective shelf life is only a week or two.
Additional information about general medical cleaning and decontamination can be found at https://www.cdc.gov/hicpac/Disinfection_Sterilization/6_0disinfection.html
Maintenance
Regularly verify that the valve is functional, and check the valve and valve holder to make sure they are in the right tracks. Inspect and replace straps and buckles with tears and other damage, and make sure they are correctly fastened to the VSB.
Repair
Badly damaged valves, straps, or handles should be replaced.
If the VSB has a vacuum leak, first remove the valve and rinse it in water. Then, reseal the valve on the VSB and vacuum the VSB to test. If the VSB is still leaking, take out all the air, making it as stiff as possible, go to a quiet room, and listen for the location of the leak with a stethoscope.
A Med Tech Repair Kit can be used to patch holes. For small penetrations, apply one drop of the special Polyurethane glue from the repair kit to the opening of the hole. Wait 5 minutes and apply one more drop of glue. Then wait one hour to let the glue dry. If there is a rip or tear, use patches and instructions provided in the repair kit.
In the field it may be possible to temporarily hold a leak using tape.
If the pump fails it is usually from dirt or a seal that has moved. It can usually be repaired in the field by unscrewing the cap and cleaning the dirt out or moving the seal back into place. The VSB and VSL will still provide a significant amount of protection even if the air cannot be evacuated due to a bad pump.

