
A subject who will be transported via litter must be properly secured in the litter. This process is called “patient packaging”. All injuries must be considered, and the patient must be immobilized as necessary. This may mean securing and immobilizing an injured limb or the patient’s spine.
Principles
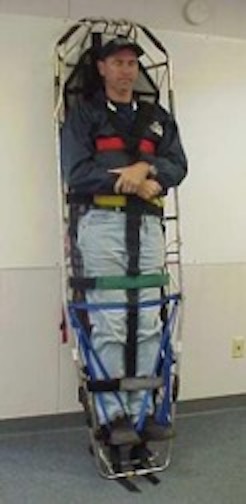
- Think of the litter as simply handles for the patient. You should be able to put the litter in any orientation with no significant movement of the patient.
- While the patient must be secure, be careful to not interfere with the patient’s breathing by having the chest straps too tight across the chest. Doing restricts the chest cavity which cannot expand sufficiently for breathing.
- It is important to monitor the patient’s airway while packaging. It also important to monitor the patient’s potential state of nausea. If the patient states that they are going to vomit, or appears to vomit, it is critical that the patient/litter be rolled on its side to allow the vomit to fall out of the mouth. A patient that vomits in the supine position is likely to aspirate the vomit which will lead to Pneumonia and an extended hospital stay.
- All patients should have a helmet placed on their head and secured with the chin strap. The exception to this is when the patient is placed in the full body splint for cervical spine injuries.
- Placing something under the patient’s knees will improve patient comfort, especially on long carry-out operations. This includes a patient with a knee injury.
- Be certain that all tie-ins are sufficiently strong to hold the patient in the litter. The Velcro straps that attach the patient restraint system shoulder straps to the litter must have sufficient length of engagement or they may be pulled off of the litter with only moderate force. This is generally not an issue unless the patient is very large.
Basic steps:
- Assemble litter
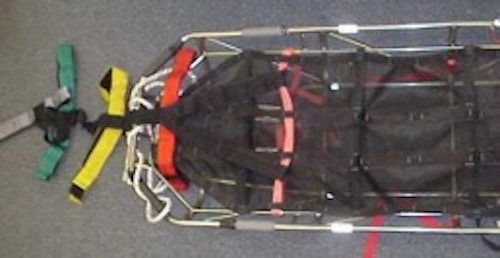
- Pull the restraint system, helmet, and knee pad out of the carry bag
- Lay the restraint system out above the head of the litter
- Adjust shoulder straps so restraint system can be pulled over patient’s head
- Be sure shoulder straps are secure – engage enough length of Velcro
- Load patient
- Put padding under patient’s knees
- Move the restraint system over patient’s head and lay out the straps across the body in their appropriate locations ensuring that the abdominal strap is located at the hips and the leg straps do not go over the knees.
- Attach the straps to the lower small rail of the litter. Do not attach the straps to top rail of litter
- The chest strap should go across the patient’s chest at the location of the Xyphoid process or lower end of the sternum. The chest strap does NOT go over patient’s arms. Having the chest strap too high on the chest can cause airway difficulties for the patient. It is important to have the patient take a deep breath and hold it while the chest strap is tightened. Once tight ensure you tell the patient they can resume breathing.

- Once all straps are tight you will tighten the shoulder straps.
- Put helmet and eye protection on patient
- Tie foot restraint (can be done simultaneously with restraint system)
- For a patient with no leg injury. . .Tie one end of webbing to litter about at patient’s knees
- Run webbing under both feet and loop webbing around litter opposite initial tie-off; secure with an overhand knot
- Pass webbing around webbing that runs between patient’s feet
- Tie webbing off near initial tie-off with a round turn and two half hitches
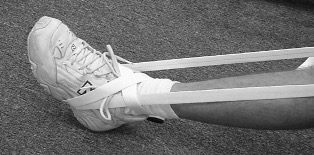
- For a patient with a leg (incl knee injury) you will only secure the uninjured leg as follows. . .
- Secure the webbing onto the litter on the uninjured side of the patient.
- Then run the webbing under the uninjured foot, across the top of the foot, behind the ankle, back across the top of the foot (you will create a cross with the webbing), under the foot and up the foot to the ankle. You will then secure the webbing to the same side of the litter as the uninjured leg. Do not attempt to secure the webbing under or over the injured leg to the opposite side of the litter.
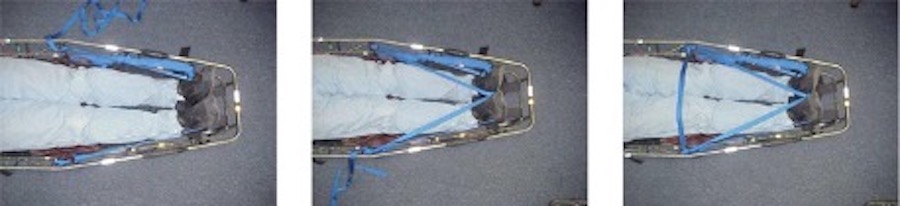
The Wiggies is a heavy-duty, medical-grade sleeping bag. The medical-grade is based on the fabric (easy to disinfect) and the number and locations of patient access points. The Wiggies is utilized on patients to maintain their body temperature. In almost all cases the patient has been standing still for several hours before SAR members arrive. This can easily result in a hypothermic patient upon our arrival even in warm temperatures (above 75/80 degrees). In many cases the patient can easily become hypothermic during litter transport as cool air under the back can cool the patient very quickly. The patient’s build, temperature (not just current temp but the temp anticipated during the entire carryout), patient’s medical condition, length of evac, etc. are all critical items that must be considered. You must think ahead as to whether the patient should be completely placed in the Wiggies before being packaged in the litter or just place the bottom of the Wiggies under the patient (this gives the option to place the Wiggies top on the patient later without taking them out of the litter). Below is some basic guidance for Wiggies use with temps at or below 75 degrees:
- A Wiggies must be considered any time the temperatures are 75 degrees or below. If your patient is warm and comfortable upon your patient contact then just placing the bottom portion of the Wiggies under the patient is most likely sufficient.
- A patient that is cool upon SAR arrival would indicate that the patient be placed inside the Wiggies.
- A patient that is cold upon SAR arrival would indicate the placement of a heat blanket inside the Wiggies and then the patient placed inside the Wiggies on top of the heat blanket. Heat packs can also be added to improve patient comfort.
- Regardless of temperature if you have a cool to cold, shivering patient when you arrive you must place the patient into the Wiggies. A patient in shock can be hypothermic with ambient temperatures above 90 degrees.
Other:
- It is important to talk to your patient and explain what you are doing and why it is being done. Many patient are nervous about being secured into the litter.
- If a patient has a head, spinal, or pelvic injury, they must be first packaged in the full body splint before being placed/secured into the litter.
- Have conscious and alert patient hold onto the hand loop. An unresponsive patient should have their hands secured with the Velcro hand loop.
- Some patients may be combative. This can happen with head injuries, patients on drugs, diabetic patients, etc. It is recommended to secure them in the full body splint first as this splint provides the best means of securing the patients arms, hands, and legs. In the absence of the full body splint, you can use roller gauze to secure the hands and arms or place the patient in an emergency blanket first wrapping their arms and hands inside the blanket before securing them with the restraint system.
- The final step of patient packaging is for the Safety Officer to verify that the packaging has been done correctly and the patient is secure.

